OpenID Connect (OIDC)
Integrate with OAuth 2.0 / OpenID Connect providers for modern authentication. OIDC provides a simpler setup than SAML while offering similar enterprise features.
Overview
OIDC integration provides:
- Modern authentication — Built on OAuth 2.0
- Simple configuration — Fewer settings than SAML
- Automatic discovery — Provider configuration via well-known endpoint
- Token-based sessions — Secure, stateless authentication
Supported Providers
| Provider | Issuer URL | Notes |
|---|---|---|
https://accounts.google.com | Google Workspace or personal | |
| Auth0 | https://your-tenant.auth0.com | Full-featured IdP |
| Keycloak | https://keycloak.company.com/realms/your-realm | Self-hosted option |
| Okta | https://your-org.okta.com | Enterprise IdP |
| Azure AD | https://login.microsoftonline.com/{tenant}/v2.0 | Microsoft cloud |
| OneLogin | https://your-domain.onelogin.com/oidc/2 | Enterprise SSO |
| Ping Identity | https://auth.pingone.com/{env-id}/as | Enterprise |
| Custom | Any OIDC-compliant issuer | Must support discovery |
Configuration
Step 1: Create OAuth Application
Create an OAuth/OIDC application in your identity provider.
Google
- Go to Google Cloud Console
- APIs & Services > Credentials > Create Credentials > OAuth Client ID
- Application type: Web application
- Authorized redirect URIs:
https://anaphora.company.com/oauth/callback - Copy Client ID and Client Secret
Auth0
- Applications > Create Application
- Choose "Regular Web Application"
- Settings tab:
- Allowed Callback URLs:
https://anaphora.company.com/oauth/callback - Allowed Logout URLs:
https://anaphora.company.com
- Allowed Callback URLs:
- Copy Domain, Client ID, and Client Secret
Keycloak
- Clients > Create Client
- Client ID:
anaphora - Client Protocol: openid-connect
- Access Type: confidential
- Valid Redirect URIs:
https://anaphora.company.com/oauth/callback - Copy Client Secret from Credentials tab
Okta
- Applications > Create App Integration
- Sign-in method: OIDC
- Application type: Web Application
- Sign-in redirect URIs:
https://anaphora.company.com/oauth/callback - Copy Client ID and Client Secret
Azure AD
- App registrations > New registration
- Redirect URI: Web >
https://anaphora.company.com/oauth/callback - Certificates & secrets > New client secret
- Copy Application (client) ID and secret value
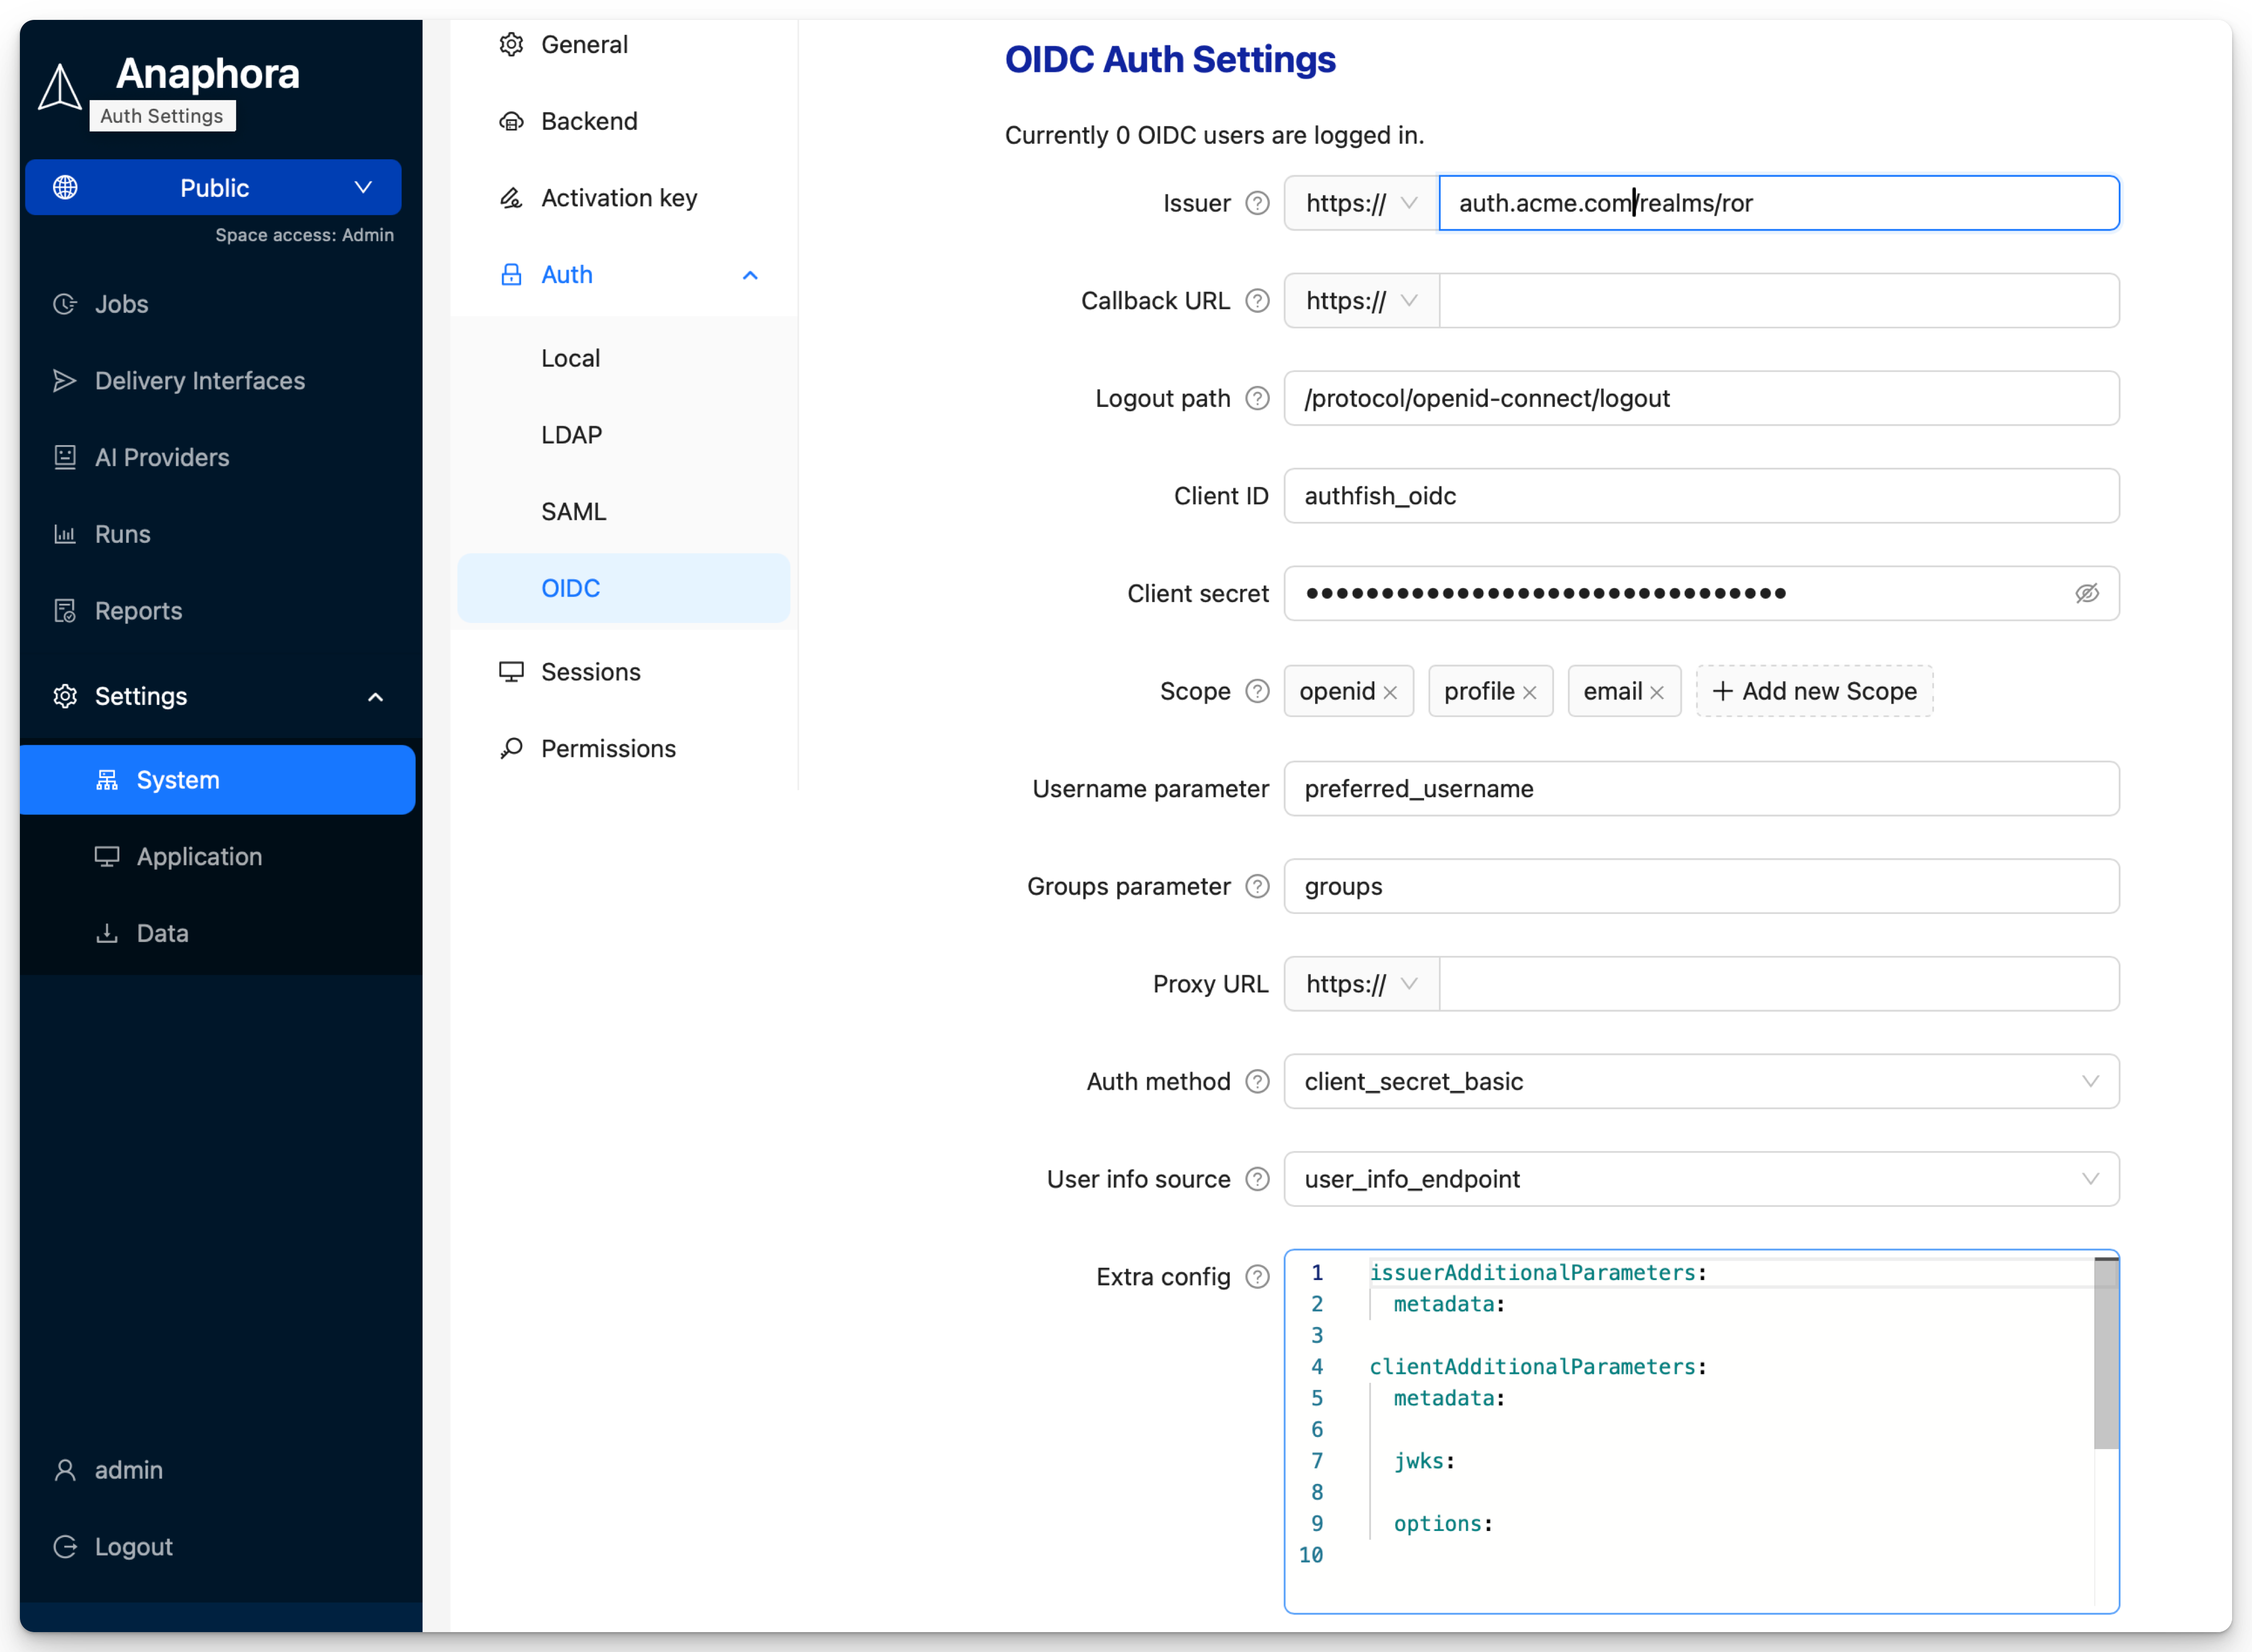
Step 2: Configure in Anaphora
- Go to Settings > Authentication > OIDC
- Enter the configuration:
| Field | Description | Example |
|---|---|---|
| Client ID | OAuth client identifier | abc123def456 |
| Client Secret | OAuth client secret | (stored encrypted) |
| Issuer URL | OIDC discovery endpoint | https://accounts.google.com |
| Scopes | Requested permissions | openid email profile |
- Click Save
Callback URL
The Callback URL is where the IdP redirects users after authentication.
Default: https://<anaphora-external-url>/auth/login-oidc/callback
Register this URL in your IdP's allowed redirect URIs:
| Provider | Setting Location |
|---|---|
| Authorized redirect URIs | |
| Auth0 | Allowed Callback URLs |
| Keycloak | Client Settings → Valid Redirect URIs |
| Okta | Sign-in redirect URIs |
| Azure AD | Redirect URIs |
In Keycloak, go to Clients → your client → Settings → Valid Redirect URIs and add the callback URL.
Step 3: Configure Scopes
Request appropriate scopes based on what information you need.
Default: openid, profile, email
| Scope | Data Returned |
|---|---|
openid | Required for OIDC |
email | User email address |
profile | Name, picture, etc. |
groups | Group memberships (provider-specific) |
Be careful with custom scopes. Adding non-existing scopes may cause authentication errors, such as redirect loops back to the login URL after authorization.
Claim Mapping
Map OIDC claims to Anaphora user fields.
Standard Claims
| Anaphora Field | OIDC Claim | Description |
|---|---|---|
| Username | sub or preferred_username | Unique identifier |
email | User email | |
| Display Name | name | Full name |
| Picture | picture | Avatar URL |
Group Claims
Group claim names vary by provider:
| Provider | Groups Claim |
|---|---|
groups (requires Workspace) | |
| Auth0 | https://your-app/roles (custom) |
| Keycloak | groups or realm_access.roles |
| Okta | groups |
| Azure AD | groups |
Custom Claim Mapping
- Go to Settings > Authentication > OIDC > Claim Mapping
- Map claims to Anaphora fields:
Username Claim: preferred_username
Email Claim: email
Name Claim: name
Groups Claim: groups
Group-Based Roles
Map IdP groups to Anaphora roles.
Groups Parameter
The Groups Parameter specifies which claim contains group/role information. Default: groups
You must configure your IdP to include roles/groups in the ID token.
Keycloak setup:
- Go to Client Scopes → profile
- Select Mappers → Add mapper → From predefined...
- Add the groups mapping
Role Mapping
- Go to Settings > Authentication > OIDC > Role Mapping
- Add mappings:
| IdP Group/Role | Anaphora Role |
|---|---|
anaphora-admins | Admin |
anaphora-editors | Editor |
anaphora-viewers | Viewer |
Auth0 Roles Example
In Auth0, use Rules or Actions to add roles to tokens:
// Auth0 Action
exports.onExecutePostLogin = async (event, api) => {
  const roles = event.authorization?.roles || [];
  api.idToken.setCustomClaim('roles', roles);
};
Then map in Anaphora:
- Claim name:
roles - Mapping:
admin→ Admin,editor→ Editor
Advanced Settings
Auth Method
The Auth Method specifies how credentials are sent to the token endpoint.
Default: client_secret_basic
| Method | Description |
|---|---|
client_secret_basic | Client ID and secret sent in Authorization header (URL-encoded). Standard method for most providers. |
client_secret_post | Client ID and secret sent in request body (not encoded). Use when your provider cannot decode encoded values (e.g., LemonLDAP). |
User Info Source
Configure where Anaphora obtains user profile information.
Default: user_info_endpoint
| Source | Description |
|---|---|
user_info_endpoint | Makes an additional call to the userInfo endpoint for the most up-to-date profile data. |
access_token | Extracts profile information directly from the access token. |
id_token | Extracts profile information directly from the ID token. |
Extra Configuration
The Extra Configuration field accepts a YAML object with two optional sections:
| Section | Description |
|---|---|
issuerAdditionalParameters | Customize OIDC issuer discovery behavior |
clientAdditionalParameters | Customize OIDC client configuration |
issuerAdditionalParameters:
  metadata:
    jwks_uri: https://example.com/.well-known/jwks.json

clientAdditionalParameters:
  metadata:
    default_max_age: 0
See the documentation for available options:
Use extra configuration options with caution. Incorrect settings may break OIDC authentication.
Token Settings
| Setting | Description | Default |
|---|---|---|
| Token Validation | Validate token signature | Enabled |
| Audience Validation | Verify token audience | Enabled |
| Clock Skew Tolerance | Allowed time difference | 60 seconds |
Session Settings
| Setting | Description |
|---|---|
| Session Duration | Local session lifetime |
| Refresh Tokens | Use refresh tokens for extended sessions |
| Single Logout | Logout from IdP when logging out of Anaphora |
Discovery Settings
| Setting | Description |
|---|---|
| Discovery URL | Auto-populated from Issuer URL |
| JWKS URI | JSON Web Key Set endpoint |
| Authorization Endpoint | OAuth authorize URL |
| Token Endpoint | OAuth token URL |
| UserInfo Endpoint | User information URL |
Testing
Test OIDC Configuration
- Click Test OIDC Login
- You'll be redirected to your IdP
- Authenticate with IdP credentials
- Verify redirect back to Anaphora
- Check user information was received
Debug Mode
Enable debugging to see token details:
- Enable Debug Mode in OIDC settings
- Attempt login
- Review ID token claims in debug output
- Verify groups/roles are present
Troubleshooting
| Issue | Solution |
|---|---|
| Invalid redirect URI | Ensure callback URL matches exactly in both systems |
| Invalid client | Verify Client ID and Secret |
| Discovery failed | Check Issuer URL, ensure /.well-known/openid-configuration is accessible |
| Groups not received | Verify scopes include groups, check IdP configuration |
| Token expired | Check clock synchronization, adjust skew tolerance |
Common Errors
"invalid_client"
- Client ID or Secret is incorrect
- Client Secret may have expired (regenerate)
"redirect_uri_mismatch"
- Callback URL in Anaphora doesn't match IdP configuration
- Check for trailing slashes, http vs https
"invalid_scope"
- Requested scope not allowed by IdP
- Remove unsupported scopes
Provider-Specific Notes
Google Workspace
To get group memberships:
- Enable Directory API in Google Cloud Console
- Configure domain-wide delegation
- Add
https://www.googleapis.com/auth/admin.directory.group.readonlyscope
Azure AD
For group claims:
- App registration > Token configuration > Add groups claim
- Choose "Groups assigned to the application" for large directories
Keycloak
Groups are included by default. Configure client mappers for custom claims.
Best Practices
- Use HTTPS for all endpoints
- Store Client Secret securely (Anaphora encrypts it)
- Request minimal scopes needed
- Map groups to roles for scalable access management
- Monitor token expiration and refresh behavior