SAML / Single Sign-On
Integrate with SAML 2.0 identity providers for enterprise single sign-on. Users authenticate through your corporate IdP and are automatically provisioned in Anaphora.
Overview
SAML SSO provides:
- Single Sign-On — One login for all applications
- Centralized access control — Manage users in your IdP
- Automatic provisioning — Users created on first login
- Group-based roles — Map IdP groups to Anaphora roles
Supported Identity Providers
| Provider | Status | Notes |
|---|---|---|
| Okta | Tested | Full support |
| Azure AD | Tested | Full support |
| OneLogin | Tested | Full support |
| Google Workspace | Tested | SAML app required |
| PingFederate | Compatible | Standard SAML 2.0 |
| ADFS | Compatible | Standard SAML 2.0 |
| Keycloak | Compatible | Standard SAML 2.0 |
| Custom IdP | Compatible | Any SAML 2.0 compliant |
Configuration Steps
Step 1: Download SP Metadata
- Go to Settings > Authentication > SAML
- Click Download SP Metadata
- Save the XML file — you'll upload this to your IdP
The metadata contains:
- Entity ID (SP identifier)
- Assertion Consumer Service URL
- Signing certificate
Step 2: Configure Your IdP
Create a new SAML application in your identity provider.
Okta
- Admin Console > Applications > Create App Integration
- Select SAML 2.0
- Upload Anaphora SP metadata or enter manually:
- Single Sign On URL:
https://anaphora.company.com/saml/acs - Audience URI:
https://anaphora.company.com/saml/metadata
- Single Sign On URL:
- Configure attribute statements (see below)
- Assign users/groups
Azure AD
- Azure Portal > Enterprise Applications > New Application
- Create your own application > Non-gallery
- Single sign-on > SAML
- Upload metadata file or enter:
- Identifier:
https://anaphora.company.com/saml/metadata - Reply URL:
https://anaphora.company.com/saml/acs
- Identifier:
- Configure claims mapping
- Assign users/groups
OneLogin
- Applications > Add App > SAML Custom Connector
- Configuration tab:
- ACS URL:
https://anaphora.company.com/saml/acs - Audience:
https://anaphora.company.com/saml/metadata
- ACS URL:
- Parameters tab: Add attribute mappings
- Access tab: Assign roles
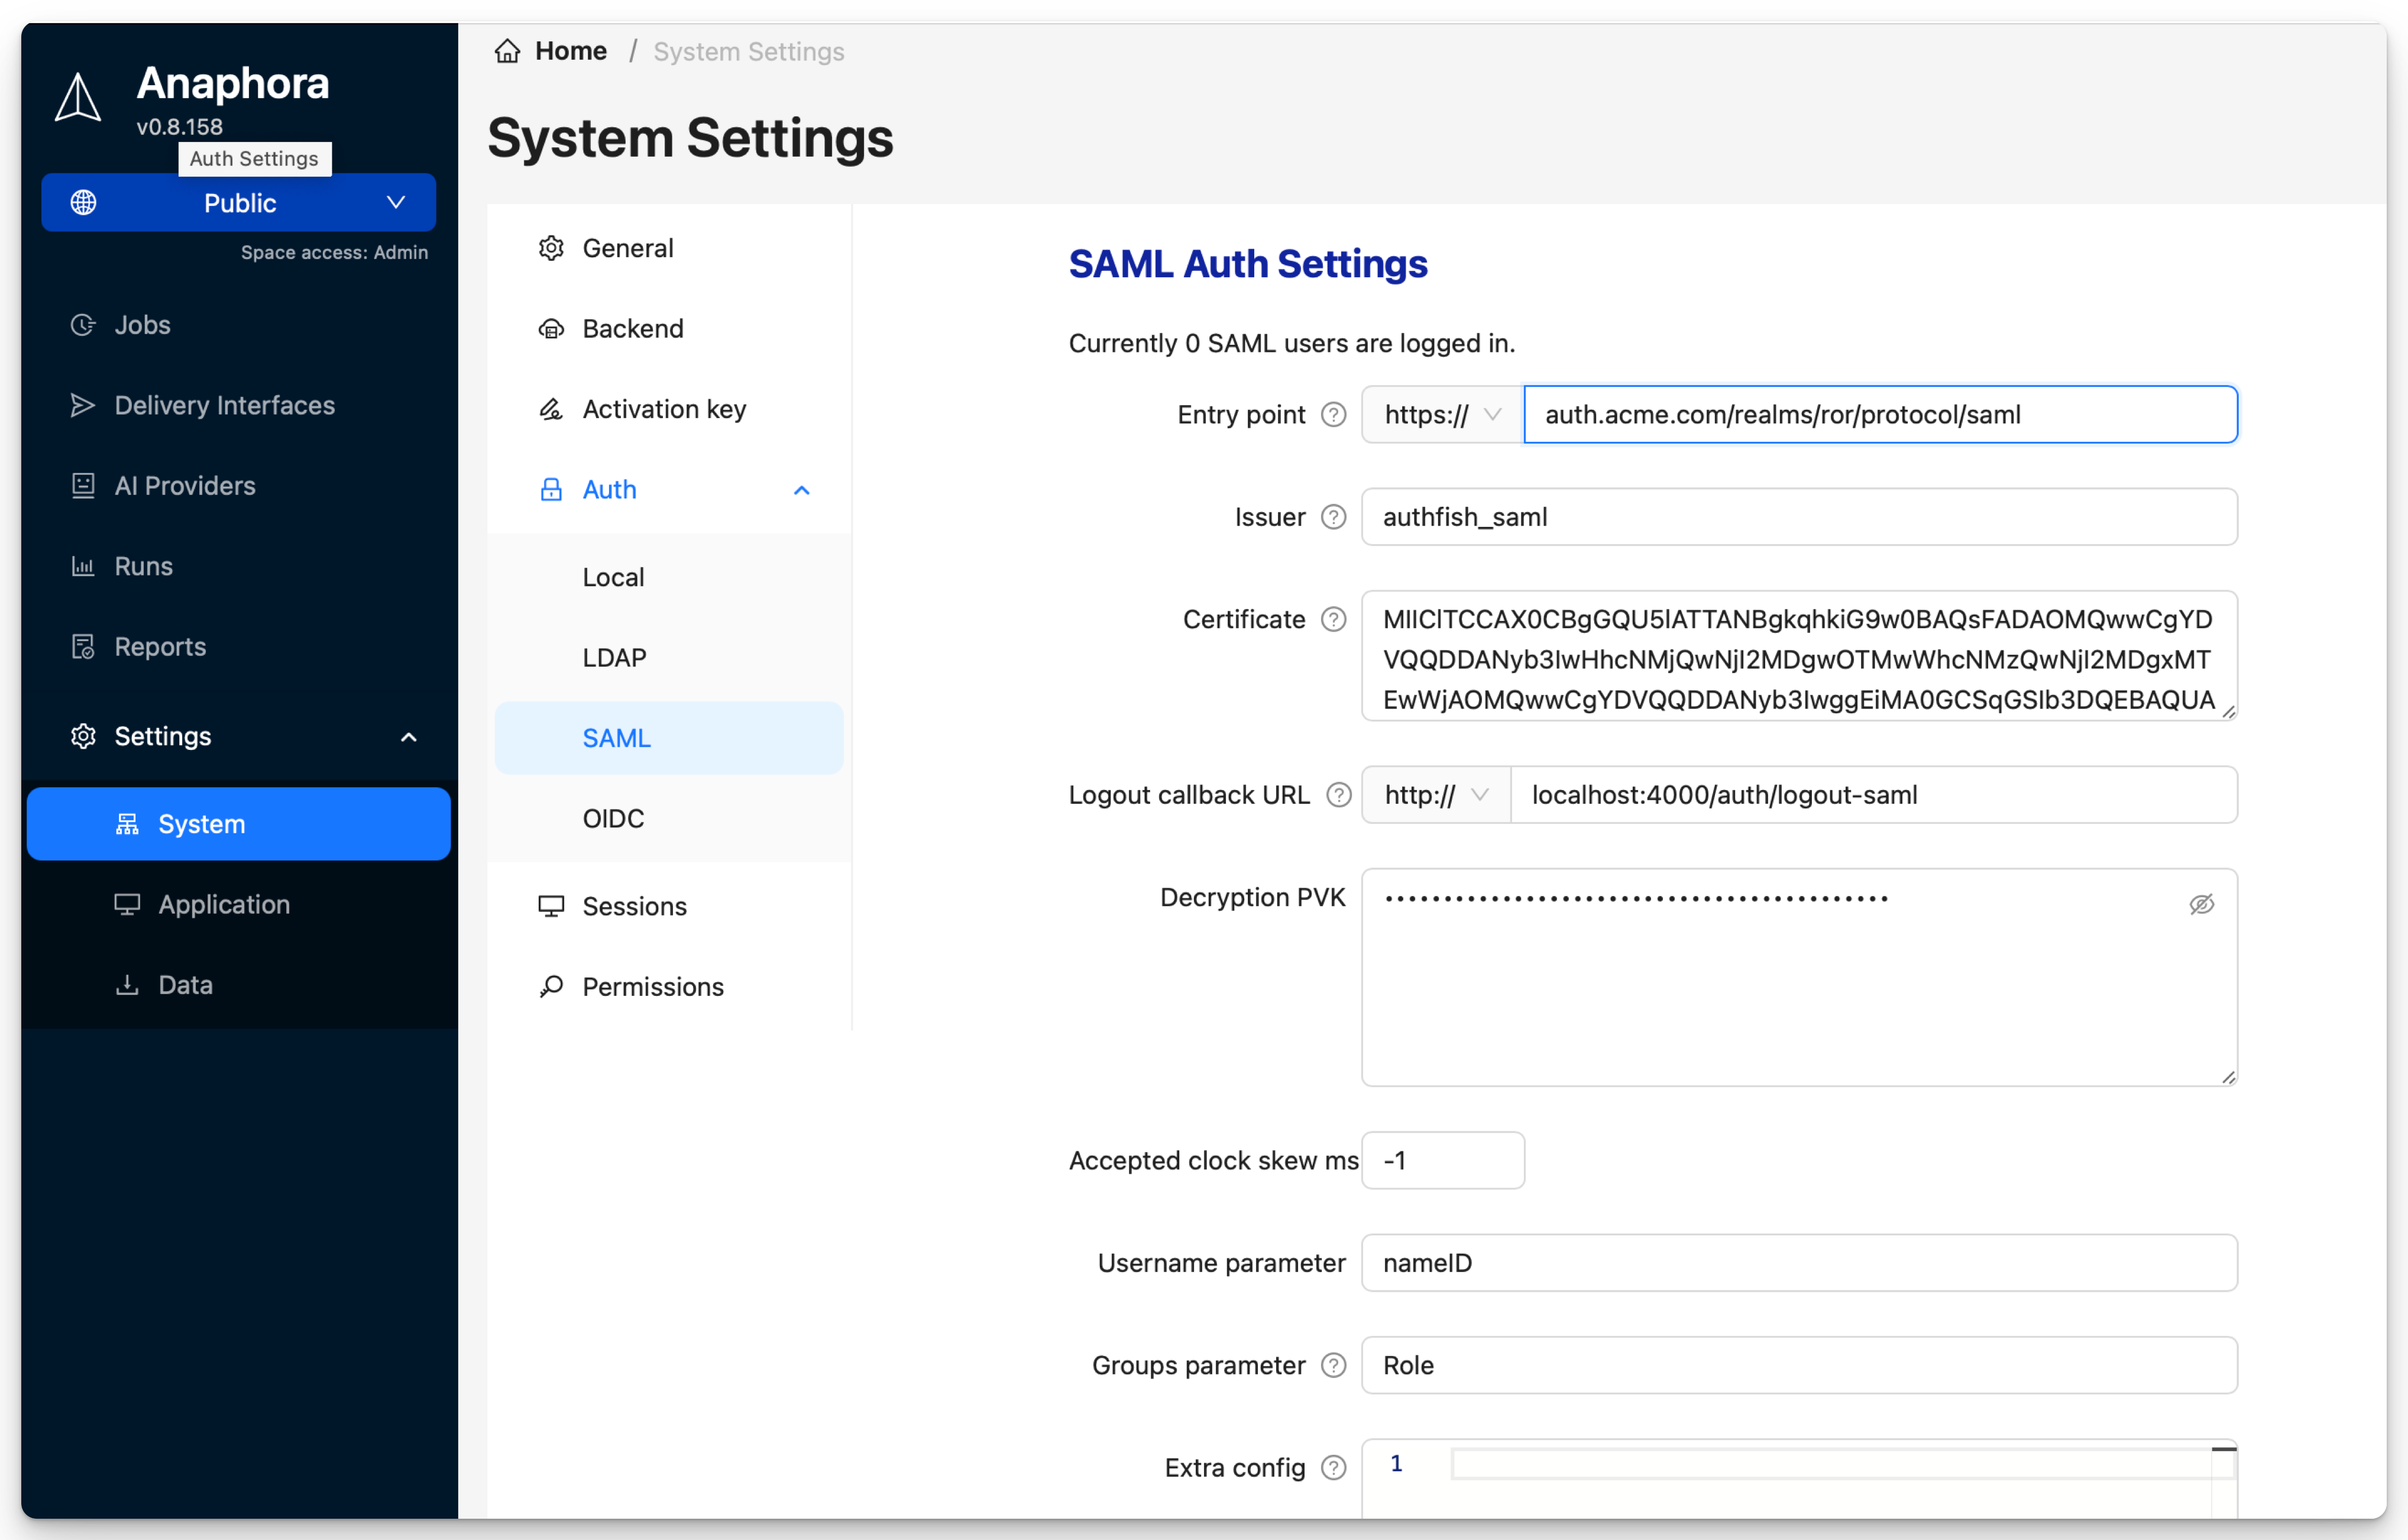
Step 3: Enter IdP Metadata
Back in Anaphora:
- Go to Settings > Authentication > SAML
- Choose one method:
- Metadata URL: Enter your IdP's metadata URL (recommended)
- Metadata XML: Upload/paste the IdP metadata file
- Click Save
Signing Certificate
The Certificate field contains the IdP's signing certificate for validating SAML assertions. This is the X.509 certificate found in your IdP's SAML metadata as <ds:X509Certificate>.
Keycloak: The metadata URL is:
https://<keycloak-host>/realms/<your-realm>/protocol/saml/descriptor
The certificate is a long Base64-encoded string, for example:
MIICizCCAfQCCQCET8tKaMc0BMjANBgkqh...g=
When using Metadata URL, the certificate is automatically extracted. Manual entry is only needed when configuring without metadata.
Step 4: Map Attributes
Configure how IdP claims map to Anaphora user fields.
Attribute Mapping
Required Claims
| Anaphora Field | SAML Claim | Description |
|---|---|---|
| Username | NameID | Unique user identifier |
email or mail | User email address |
Optional Claims
| Anaphora Field | SAML Claim | Description |
|---|---|---|
| Display Name | displayName | Shown in UI |
| Groups | groups or memberOf | For role mapping |
| First Name | firstName | User's first name |
| Last Name | lastName | User's last name |
Okta Attribute Statements
Name: email
Value: user.email

Name: firstName
Value: user.firstName

Name: lastName
Value: user.lastName

Name: groups
Value: (Group membership attribute)
Azure AD Claims
Claim name: email
Source attribute: user.mail

Claim name: displayName
Source attribute: user.displayname

Claim name: groups
Source attribute: user.groups
Group-Based Roles
Map IdP groups to Anaphora roles for automatic permission assignment.
Groups Attribute Configuration
The Groups Parameter setting specifies which SAML attribute contains group/role information. Default: Role
You must enable Single Role Attribute (also called Single Role Attribute Mapping or Roles as Claims depending on your IdP) in your identity provider. Without this, group claims may not be sent correctly.
Keycloak setup:
- Go to Client Scopes → role_list
- Select Mappers → role_list
- Enable Single Role Attribute
Role Mapping
- Go to Settings > Authentication > SAML > Role Mapping
- Add group mappings:
| IdP Group | Anaphora Role |
|---|---|
Anaphora-Admins | Admin |
Anaphora-Editors | Editor |
Anaphora-Viewers | Viewer |
Space Mapping
Map groups to Space memberships:
| IdP Group | Space | Role |
|---|---|---|
Team-Alpha | Alpha Reports | Editor |
Team-Beta | Beta Reports | Editor |
All-Staff | Company Dashboards | Viewer |
Advanced Settings
SAML Configuration Options
| Setting | Description | Default |
|---|---|---|
| Sign Requests | Sign authentication requests | Enabled |
| Require Signed Assertions | Require IdP to sign assertions | Enabled |
| Require Encrypted Assertions | Require assertion encryption | Disabled |
| Allow IdP-Initiated SSO | Allow login initiated from IdP | Enabled |
Extra Configuration
The Extra Configuration field accepts a YAML object with additional SAML strategy options. Use this to override or extend the default SAML configuration.
wantAssertionsSigned: true
allowCreate: true
Common options:
| Option | Description |
|---|---|
wantAssertionsSigned | Require signed assertions |
allowCreate | Allow IdP to create new identifiers |
forceAuthn | Force re-authentication on each request |
passReqToCallback | Pass request to verify callback |
disableRequestedAuthnContext | Skip authentication context |
See the full list of available options in the node-saml documentation.
Use extra configuration options with caution. Incorrect settings may break SAML authentication.
Session Settings
| Setting | Description |
|---|---|
| Session Duration | How long SSO session lasts |
| Single Logout (SLO) | Enable SAML Single Logout |
| Force Re-authentication | Require fresh IdP login |
Testing
Test SAML Configuration
- Click Test SAML Login
- You'll be redirected to your IdP
- Authenticate with IdP credentials
- Verify redirect back to Anaphora
- Check user attributes were received correctly
Debug SAML
Enable SAML debugging to see assertion details:
- Go to Settings > Authentication > SAML
- Enable Debug Mode
- Attempt login
- Review SAML assertion in debug output
Troubleshooting
| Issue | Solution |
|---|---|
| Redirect loop | Check ACS URL matches exactly in both systems |
| Invalid signature | Verify IdP certificate is current in Anaphora |
| User not provisioned | Check attribute mapping, verify email claim exists |
| Groups not mapped | Verify groups claim is sent, check group name format |
| Clock skew error | Ensure server times are synchronized (NTP) |
Common Errors
"SAML Response validation failed"
- Certificate mismatch: Re-download IdP metadata
- Clock skew: Check server time synchronization
"NameID not found"
- IdP not sending NameID
- Check IdP configuration for NameID format
"Attribute 'email' required"
- Email claim not mapped in IdP
- Add email attribute statement
Best Practices
- Use metadata URL for automatic certificate rotation
- Enable signed assertions for security
- Map groups to roles rather than individual users
- Test thoroughly before enabling for all users
- Keep IdP metadata updated when certificates rotate